Sometimes only running Google Ads won’t get you the conversions you might expect. No matter how many times you tweak your campaign settings you may not be able to move the needle further.
And this is where performing A/B testing on your landing page can help. Google has a program called Optimize to help you with this.
In this article, we will explain how to set up Optimize via Google Tag Manager. We will also show you how you can set up an experience to run.
But first, let’s take a look at what A/B testing is and why it’s important.
Imagine you had what you thought was a killer landing page. But when you run your display ads it hardly converts.
How can you perform tests to see what was the reason behind this?
That’s where A/B testing is useful.
What is A/B Testing?
A/B testing lets you show two different designs of your landing page to a percentage of your visitors.
You may want to test if removing images or changing fonts or moving the form in each design converts more.
You can choose to show these two designs to select visitors and from that, you can see which one converts more.
A/B testing is a great way to perform more than one test to your website visitors.
What is MVT Testing?
There is also multivariate testing (MVT). With this, you can test changing many variables. It’s about measuring how effective each design combination is. An example of MVT would be changing different headlines and images on a page and seeing how they perform.
If this were A/B testing, you would need to create two separate designs to test this. In MVT you can choose to change more than one element instead.
If your landing page had one headline, two images, and a sign-up form you can use this as an MVT. This would mean testing different headlines, different images, and a modified form.
Site visitors see all possible design variations. This allows you to see what performs best. MVT is best for sites that get a large amount of daily traffic.
Let’s now go through how to set up Google Optimize so that you can start to run A/B or MVT on your website.
Setting Up Google Optimize Using Google Tag Manager
The easiest way to install Optimize on your website is by using Google Tag Manager.
To do this, follow these steps:
- Log in to Google Tag Manager
- Make sure you are in the correct workspace.
- Click New Tag.
- Give your tag a name.
- Under Tag Configuration, click Edit.
- Click Google Optimize as the tag type.
- Type in your Optimize Container ID.
- Under Google Analytics Settings, make sure ‘Enable overriding settings in this tag’ is checked.
- Type in your Google Analytics tracking ID.
- Under Triggering, click + and make sure All Pages is selected and then Save.
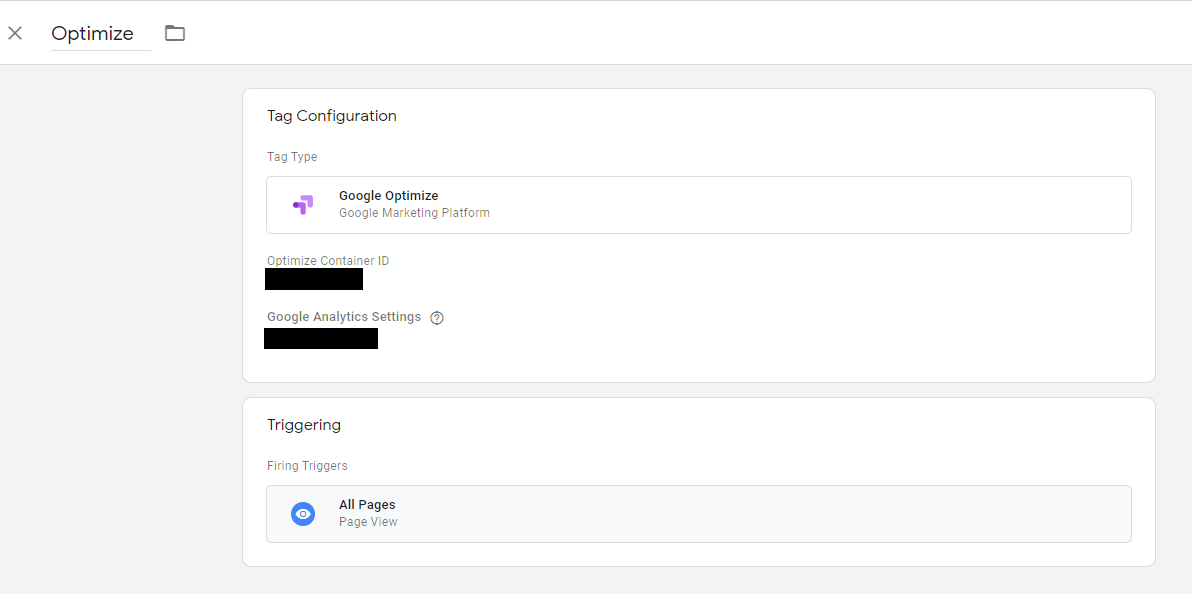
Now there is some different data you need to set up this tag.
Let’s go through them.
Step 7 asks you for your Google Optimize container ID. Step 9 asks you for your Google Analytics tracking ID. If you don’t have that information to hand, fill out all the details that you can. But don’t save the tag.
Open up Google Optimize in a new browser tab. So you have one tab with Google Tag Manager and a new tab with Google Optimize.
Proceed to the next section to create a new Optimize container, then go back and complete these steps
Creating a new Optimize account
To perform testing you first must create a new Optimize container. This means you must also create a Google Optimize account if you have not done so already.
Once you have logged in to Optimize, click Create Account and fill out the details. This will give you a Container ID.
Once you have done that, click your container name. You can now start creating experiences for your A/B and MVT tests.

Creating a new Optimize experience
Now we can go through the steps to create a new Optimize experience.
This will be the basis of what you want to test.
For this example, we will do an MVT test.
- Click Create Experience.
- Give your experience a name.
- Choose the experience type you want to create – we will choose a Multivariate test.
- Click Create.
- Under Page Targeting, set the URL that you want to test against.
- Under Variants, you set the variables to change.
- In Section A, click Add Variant.
- Give it a name (e.g. ‘Remove header’).
- Click on the variant and the page from step 5 will open.
- Click the element you want to change.
- Click Edit Element.
- Edit the HTML or remove the element.
- Go through your page and edit your other elements (e.g. delete text, change font etc.).
- Click Save and then click Done.
- Add any other variants under Section A.
- Follow the same steps to add variants to Section B.
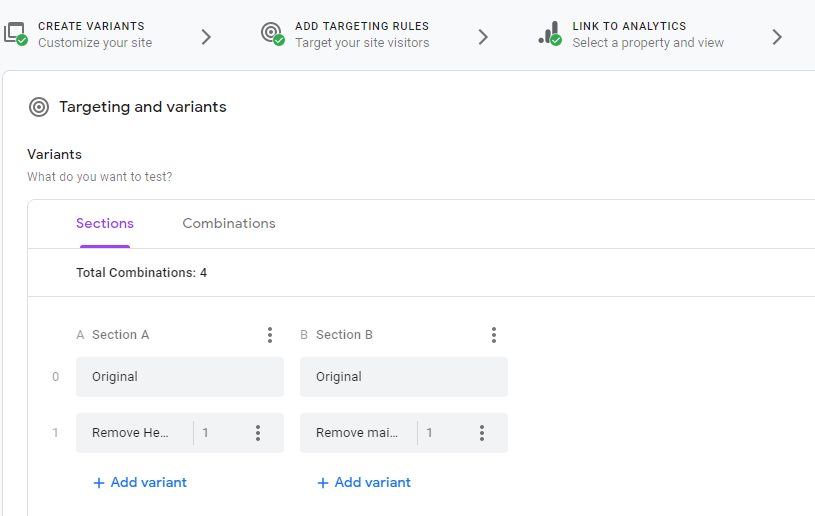
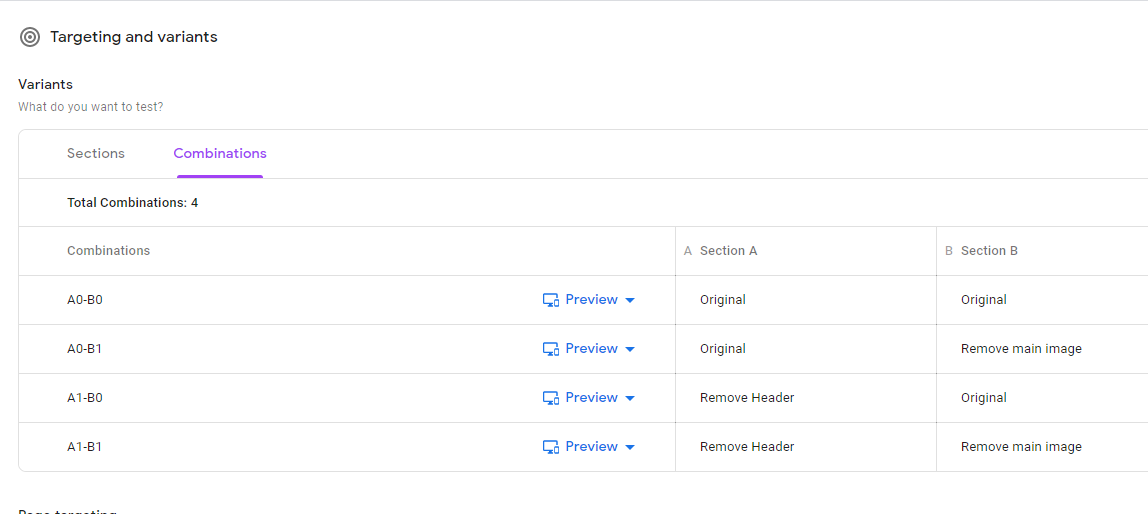
You can then click Combinations to view all the different combinations. These combinations are the variants you added in Section A and Section B.
For example, if you added two variants to each section, it would look like this:
- A0-B0 – This is the original page with no changes for both sections.
- A0 – B1 – Original page versus one variant from section B.
- A1 – B0 – First section A variant versus original page in section B.
- A1-B1 – These are section A and section B variants compared.
All possible combinations are shown in this section. You can also choose to add more sections with their own variants to your experience.
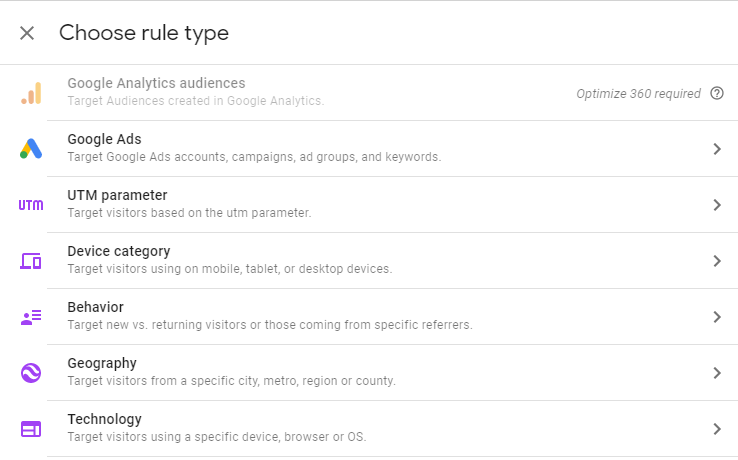
Under Audience Targeting, you can choose the specific audience that you want to show your MVT to.
Under Description, enter a description of your test.
Under Measurement and Objectives, make sure your Google Analytics property is listed.
Under Objectives, choose the goal of your experiment.
This can be to measure pageviews. Or bounces. Or session duration etc. You can also select any of your own Analytics goals.

Choose whether to receive email notifications about your experience.
Choose what visitor percentage you want to show your experience to.
Finally, set the event type to trigger the experience.
Now it’s time to finish setting up Google Tag Manager.
You should now have a container ID.
Go back to your Google Tag Manager website tab and fill out step 7 and save the tag.
Click Submit to save all changes to your Google Tag Manager account.
Go back to your Google Optimize website tab.
Under Settings, click Check Installation to make sure that everything works.

Once you have completed all the information you can click Start at the top of the page to run the experience.
Tracking Your Experience Data
Inside your Google Analytics account, you can view the performance of your experience.
Luckily Optimize gives you easy access to this data.
- Click your experience name.
- Under Details, scroll down to Measurements and Objectives.
- Click View Report in Analytics.
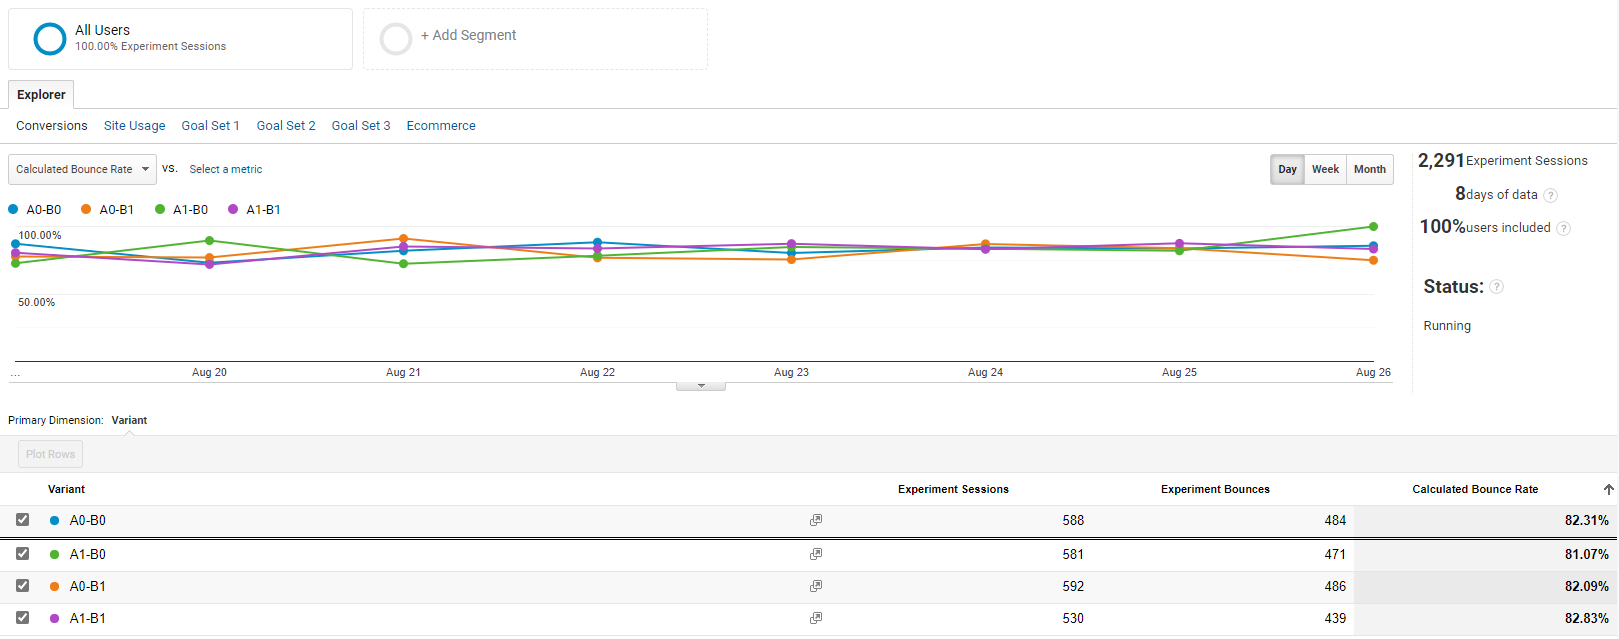
You can also click the Reporting tab instead to view the report data inside Google Optimize.
Make sure you have permission to access the linked Analytics account. Or it won’t work.
So what can this data tell you? There is a wealth of information. Using this you can decide how well your experience performed.
The data inside Optimize or Analytics is similar in both places.
The data includes information such as:
- The calculated bounce rate for each of your combinations. In our example the objective was to measure bounce rate).
- The number of sessions.
- The number of bounces.
Inside Optimize the data also includes probability. This means how probable it is for each variant to beat the original. It also includes a modelled bounce rate and a modelled level of improvement vs the original.
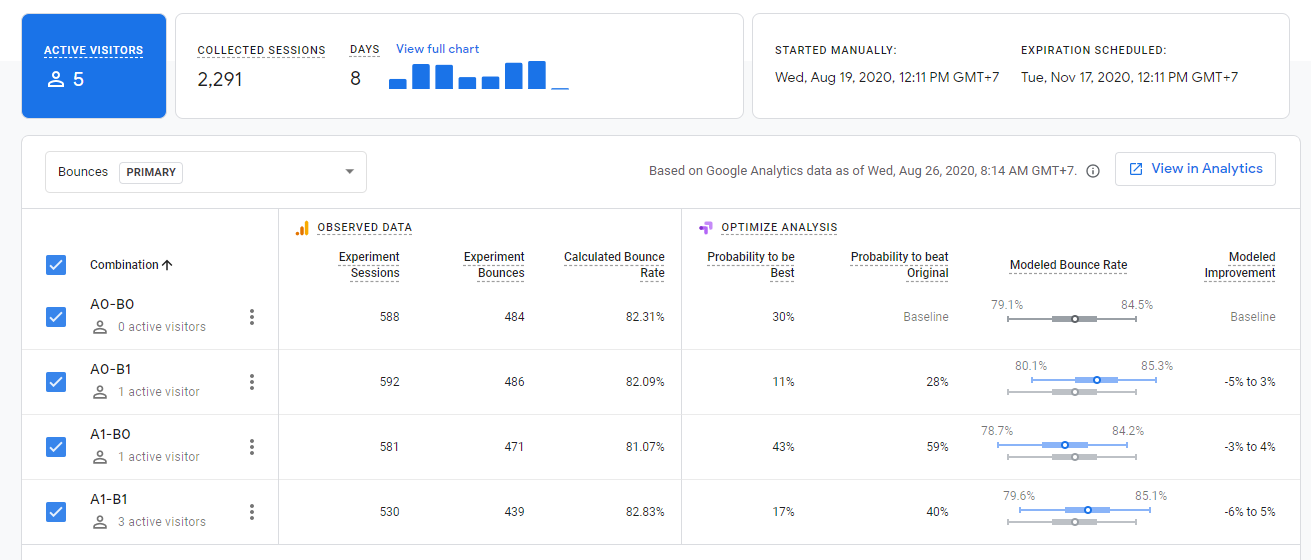
Again, in our example, the objective was to measure the bounce rate to see if our changes lowered it. If your experience objective is different then it will be modelled against that.
But no matter where you view the data you can see how well each combination performs.
It allows you to see if your MVT or A/B test was a success.
It can also help you increase conversions based on what objective you want to achieve.
You might want more conversions, but you notice people aren’t spending much time on your site. You can set your Optimize objective to increase the page session time.
Google Optimize allows you to test this by changing various page elements to try and meet your objective.
When running these experiences it makes sense not to rush. Let the experiences run for as long as possible. This lets you get as much data as possible to make an informed decision.
The majority of experiences once you create them will run for at least three months.
If you can’t wait that long, then at least let it run for at least two weeks.
In Conclusion
This article has hopefully given you a taster of what you can do with Google Optimize. It’s a very powerful tool for testing changes to websites to increase their performance.
It also plays nicely with other Google systems like Analytics and Ads. This lets you get a complete picture of your data to see how it performed.

Need Help With Your Online Marketing?
Aware can get help supercharge your business, increase revenue, and reach new customers.
Let Aware manage the digital marketing for your business today!