Before we start, this may be quite a lengthy article – but following along is worth it.
Google Analytics is a very powerful tool. It allows you to see the number of visitors to your site. You can see conversions for when people buy, and much more.
But did you know that there are some things Google Analytics cannot track? These metrics are also important. How about a when a customer adds an item to cart?
There is another layer that adds even more rich data. And that’s by using the datalayer.
What is the datalayer?
The datalayer is a layer that sits between your website and Google Tag Manager. It means that you can pass any type of website data to Google Tag Manager and then to Analytics. Or any other third-party platform that Google Tag Manager supports.
Here is an example.
What if you wanted to track when a customer added an item to cart? You would need this if you are running a promotion on a certain item.
Or what if you wanted to know which blog authors on your website got the most interaction? These are things that Analytics cannot capture without a little help.
To achieve both of the scenarios above, you can use the datalayer (sometimes called ‘data layer’). You use this to hold the data that you want to capture before passing it to Google Tag Manager. Once inside Google Tag Manager you can use that information in tags and triggers.
Getting Started
It sounds great, doesn’t it? But setting it up isn’t easy.
- Install Google Tag Manager on your site.
- Set up the data layer code above your Tag Manager code snippet.
- Add the variables you want to send to the data layer.
We assume that you already have Google Tag Manager set up on your website.
If not, follow these steps:
- Sign up for Google Tag Manager.
- Once logged in, click Create Account and follow the steps. This creates a container.
- Click your new container.
- Click your GTM container ID (it looks like GTM-XXXXXXX).
- A window will appear with HTML code.
- Follow the steps to add the code to all pages of your website, make sure it’s in the right place.
- When you have installed the code, install this browser plugin.
- Go to your website and click the plugin you installed. Click the Enable button.
- Refresh your website and click the plugin again.
- You should see the list of tags installed. Google Tag Manager should be there and in green, if all is correct.
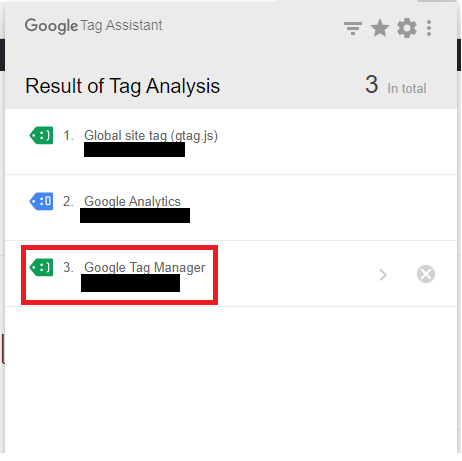

If you don’t see your Tag Manager tag, or it isn’t green, contact us and we will see if we can help you fix it.
If you want an easy way to understand the datalayer, think of it as a bucket. Inside that bucket, you can fill it with information from your website. You then pass that information to Google Tag Manager. From there, pass it to Analytics or any other supported third-party application.
Creating the Datalayer
Creating the datalayer can be easy, or it can be hard, and you will need developers. This depends on how you created your website.
To put that into context it’s easier to set up the datalayer for WordPress. This is thanks to plugins. But it’s harder to do for HTML or a Shopify site because it requires HTML coding.
Let’s start with the hard option.
Setting up the datalayer for an HTML site and pushing data
Note: Make sure you have Tag Manager code installed and working.
Open up the HTML page whose data you want to pass to Tag Manager in an HTML editor.
You interact with the datalayer using push. This allows you to push values as well as create events to fire based upon certain values.
The basic code for a datalayer push looks like this (it is empty):
window.dataLayer = window.dataLayer || [];
window.dataLayer.push({ <values to capture and push to datalayer>
});
So what can we do next?
Let’s think about this. You need to ask yourself what information you want to capture. And then, once captured, what do you want to do with it.
Let’s imagine we have a website selling men’s shoes and we have three shoes on discount.
We want to find out which discounted shoe sells the most.
What information do you think we would need to capture?
- Name – Shoe name
- SKU – Shoe SKU
- Price – Shoe discounted price
- Category – Shoe category (e.g. discount, sports, casual etc.)
- Quantity – Number of pairs bought
And how would we get this data to the datalayer using push?
We would have to create an array to push the many product details to the datalayer.
But where would we put the code? It wouldn’t be on the cart page or the checkout page.
In our example, we will put the code on the website thank you page, after purchasing.
This is because we are only interested in when any or all our discounted shoes get bought. This is the data that we want to then send to Analytics.
In the code below we create an array called ‘transactionProducts’. It grabs and pushes the data of all shoe products as a transaction to the datalayer as an event called ‘purchase’.
The data for each project is an object. That means that three objects are being passed to the datalayer.
Note: This is an example with three products purchased – you may have more!
<script>
window.dataLayer = window.dataLayer || [];
window.dataLayer.push({
  'event': 'purchase',
  'transactionId':'1234',
  'transactionTotal': 69.97,
  'transactionProducts': [{
    'name': 'Adidas Ultraboost',
    'sku': 'ADSUBM123',
    'price': 34.99,
    'category': 'discount',
    'quantity': 1
    },{
    'name': 'Hush Puppies 4HCBB12X8F',
    'sku': 'HP2X8F123',
    'price': 18.99,
    'category': 'casual',
    'quantity': 1
    },{
     'name': 'Reebok Run Supreme 4.0',
     'sku': 'RBKRS40123',
     'price': 15.99,
     'category': 'sports',
     'quantity': 1
     }]
 });
</script>
The above code uses Google’s standard ecommerce syntax. This means that we cannot change the variable names or the array name.
Another important thing to note is that you do not put in the code exactly as above.
The code above shows the result of working with variables and their output. It does not show the real variables which is what you or your developer must put in the code for it to work.
You have to use the proper variable names to get the product information.
E.g.
window.dataLayer = window.dataLayer || [];
dataLayer.push({
   'event': 'purchase',
   'transactionID': transationObj.id ,
   'transactionTotal': transactionObj.total,
   'transactionProducts': [{
     'name': productObj.name,
     'sku': productObj.id,
     'price': productObj.price,
     'category': productObj.category,
     'quantity': productObj.quantity
Would look like this after a successful purchase.
'event': 'purchase',
 'transactionId':'1234',
 'transactionTotal': 69.97,
 'transactionProducts': [{
   'name': 'Adidas Ultraboost',
   'sku': 'ADSUBM123',
   'price': 34.99,
   'category': discount,
   'quantity': 1
});
Before we finish this section, you may be asking where you get your product variables from.
Remember that we said it can be easy or hard to work with the datalayer?
It depends on how you coded your website.
For an HTML site, like our example, the variables may come from a CMS. This may store all the product values. Those values can be passed to the datalayer as variables via code like the above. It could also come from an API that allows for the same thing.
Each of these would store data as unique variable names. You would put that into your datalayer push code on your webpage to send information to the datalayer.
Now that we have cleared that up on your thank-you page, put the code above or below your Tag Manager container code.
Understanding what happens next
Now, a customer makes a purchase. When they reach the thank you page, a new event is created in the datalayer called ‘purchase’.
The event will push transaction and product details to the datalayer. This uses the values below:
- ‘transactionId’
- ‘transactionTotal’
- name’
- ‘sku’
- ‘price’
- ‘category’
- ‘quantity’
You can test this using the Tag Manager browser plugin we installed earlier.
- Log in to Tag Manager.
- Click your container.
- Click the Preview button.
- Go to your website and refresh it. The Tag Manager window should appear at the bottom of the screen.
- Pay attention to the Summary bar on the left side, and the data layer tab.
Go through the entire purchase process.
- When you reach the thank-you page, in the Summary bar, you should see ‘purchase’ appear. That means that your event works.
- Click ‘purchase’ in the Summary bar. The data layer section will appear on the right-side.
- You should now see two sections, your original code, and the datalayer.
What you should look at is the ‘Data Layer values after this message’ section.
You should see it grabs the product information of the transaction. Whilst the ‘purchase’ section on the left contains the normal code.
This is how you can test whether your event is working.
If it isn’t working, make sure you are using the correct Google variable names. Also, check with your developers. They need to use the proper variables from whatever generates your product data.
Working with Tag Manager and Analytics
We know that our datalayer event works. We know that it captures data. We now need to do something with that information.
First of we have to create variables inside Tag Manager. These variables will store the data in the datalayer from our event.
They are data layer variables.
Creating data layer variables
To create a data layer variable in Tag Manager, do the following:
- Log in to Tag Manager.
- Click your container.
- Click Variables.
- Under ‘User Defined Variables‘ click New.
- Give your variable a name (e.g. ‘dlv – Transaction ID‘). Where ‘dlv’ means ‘data layer variable‘.
- Under Variable Configuration, click the edit pencil.
- In the menu that appears, click ‘Data Layer Variable‘.
- Under Data Layer Variable Name type in the name (or key as Google calls it).
- Leave Data Layer Version as Version 2.
- Click Save.
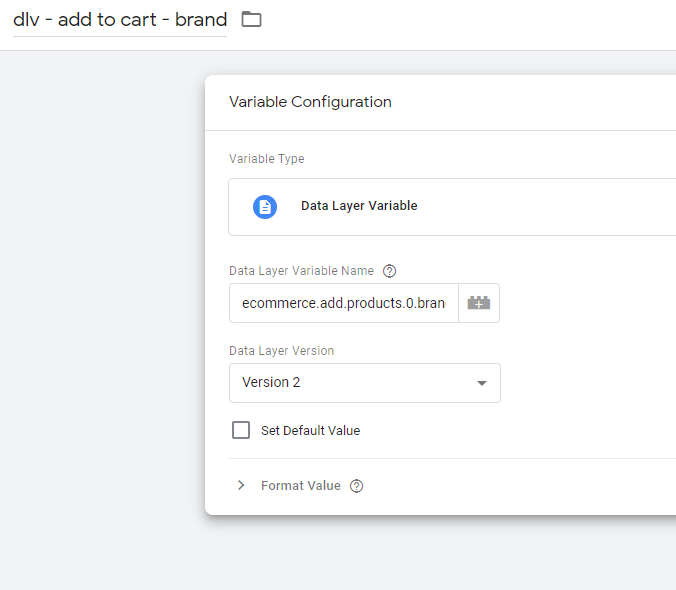

Now we need to talk about what exactly the data layer variable name is. People get confused here and putting in the wrong name means capturing no data using Tag Manager.
Let’s go back to our example.
Our data layer variable names are:
- ‘transactionId’
- ‘transactionTotal’
- name’
- ‘sku’
- ‘price’
- ‘category’
- ‘quantity’
Based on the above, if you wanted to capture the product, what do you think the data layer variable name is?
It would be name (no quotes). The same applies to the rest of the variable names above. Remove the quotes to get your data layer variable name for Tag Manager.
For our example, we would create seven new data layer variables inside Tag Manger. Each of these data layer variables would store the data from our data layer event.
We can then use them in Tag Manager tags and triggers to send the data to Analytics.
Creating triggers
Now we need to create triggers for our Analytics tag.
The most obvious tag to create is to measure transactions based on the product category.
That way we can compare how many products sold whose category was ‘discount’ versus the rest.
Let’s set up a trigger in Tag Manager to do this.
- Log in to Tag Manager.
- Click your container.
- Click Triggers.
- Click New.
- Give your tag a name.
- Click the edit pencil.
- Click Custom Event.
- Under Event Name type in purchase (that’s the name of our event).
- Click the Some Custom Events button.
- Click the data layer category variable you created.
- Make sure it is set to ‘Contains’.
- Type in the value you want (e.g. discount).
- Click Save.
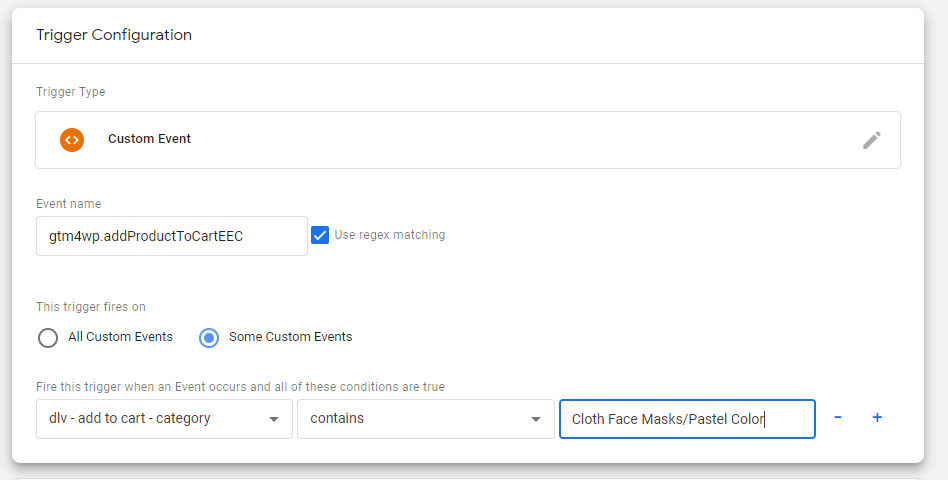

Follow the steps above to create more triggers for the other category types.
So you should have three triggers in total. One for each product category.
Creating tags
Now let’s create our Analytics tag.
Still, inside Tag Manager, follow these steps:
- Click Tags.
- Click New.
- Under Tag Configuration click the edit pencil.
- Click Google Analytics Universal Analytics.
- Under Track Type, click Event.
- Enter a category for your event (e.g. ‘Shoes‘).
- Enter an action for your event (e.g. ‘Purchase’).
- Under Value, click the + button and choose the value data layer variable you created.
- Make sure ‘Enable overriding settings in this tag’ is checked.
- Enter your Analytics tracking ID (see the ‘Testing with Analytics’ section below).
- Click More Settings.
- Click Fields to Set.
- Click Add Field and type in the following fields:
- Transaction ID
- Transaction Total
- Product Name
- Product SKU
- Product Price
- Product Category
- Product Quantity
- Under Value, select the corresponding data layer variable you created earlier.
Each field should link to a data layer variable you made.
So Product SKU would dlv – SKU and so on.
Doing this means that more detailed rich data will be pass to Analytics. For each transaction, all the information above should appear in Analytics.
- Click Ecommerce.
- Make sure ‘Enable Enhanced Ecommerce’ is set to True.
- Make sure ‘Use data layer’ is checked.
Note: In the example above, we only create one tag.
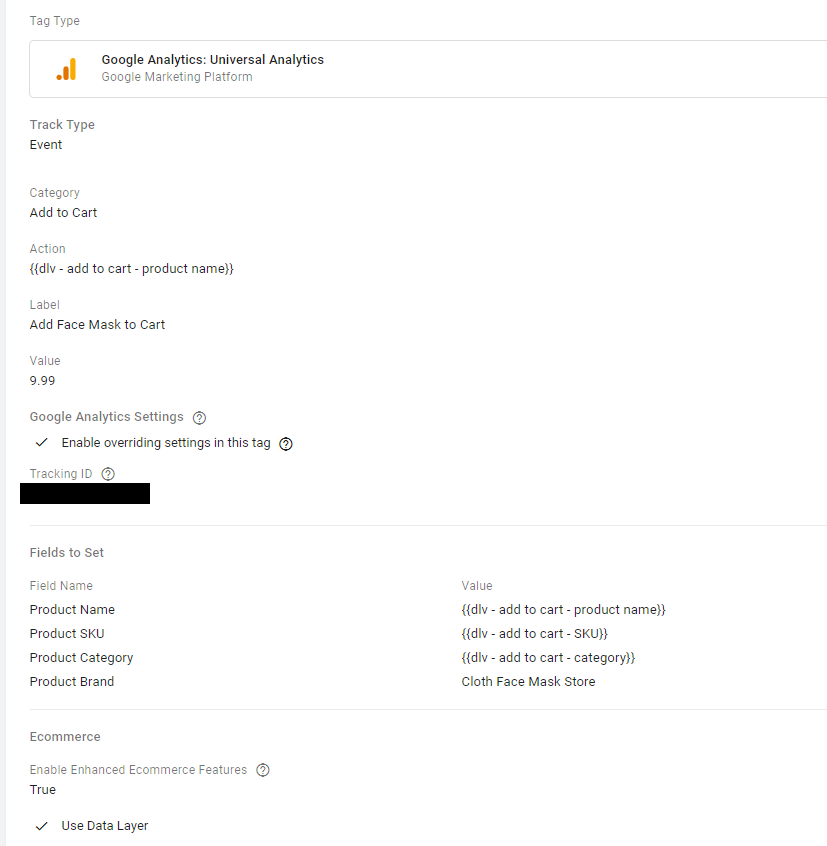

If you have more than one Analytics tag, which users the same tracking ID, it makes sense to create this as a variable.
Once the variable is created you can use it in all future tags.
To do this:
- Log in to Tag Manager.
- Click Variables.
- Under ‘User Defined Variables‘ click New.
- Give your variable a name (e.g. ‘GA Tracking Code’).
- Under Variable Configuration, click the edit pencil.
- In the menu that appears, click ‘Google Analytics Settings‘.
- Under Tracking ID, type in your GA tracking ID.
- Click Save.
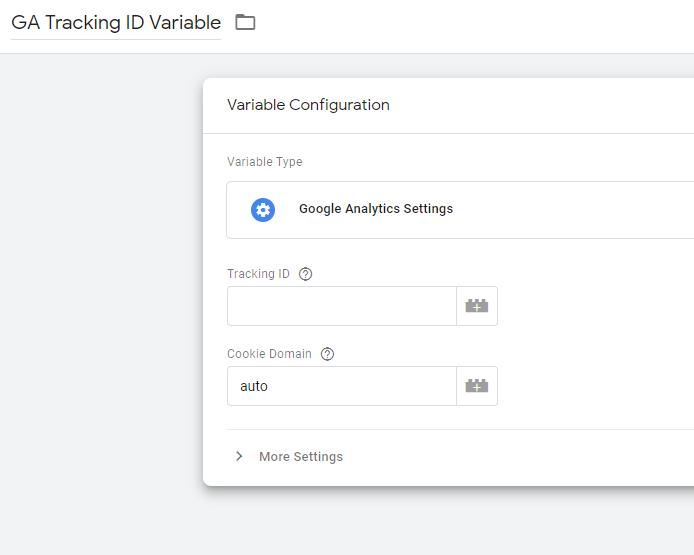

Once saved, whenever you make a new tag for Google Analytics it is a little quicker. You click the dropdown under Google Analytics Settings. Choose the variable you made to insert your tracking ID inserted via the variable.
You can then repeat this to create many GA tags pointing to the same tracking ID.
Tying it all together
Under Triggering, click the edit pencil and select the trigger you created earlier.
Now you have created your tag and triggers, it’s time to test.
Testing with Analytics
We now need to see if everything gets passed to Analytics correctly.
If you need to get your Analytics ID for Tag Manager, do the following:
- Log in to Analytics.
- Click the gear in the bottom left corner.
- Click Property Settings.
It will be listed under Tracking ID.
First of all, we need to enable ecommerce reporting.
- Log in to Analytics.
- Click the gear in the bottom left corner.
- Click Ecommerce Settings.
- Under Ecommerce, make sure that Enable Ecommerce is set to ON.
- Make sure that Enable Enhanced Ecommerce Reporting is set to ON.
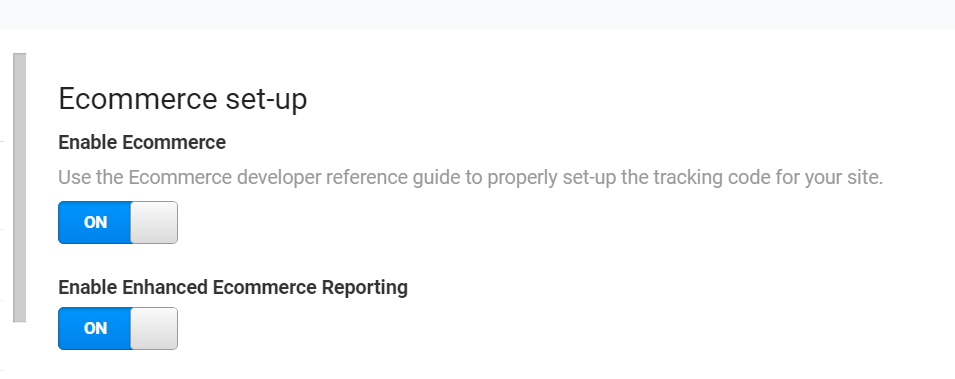

Now make sure that Analytics working.
Browse to your website and then log in to Analytics and going to Realtime > Overview. You should see yourself as a visitor (or there may already be visitors on your site).
Click the Events link, then click Events (last 30 min).
On your website, go through the purchase process again up to the thank you page. This will cause our event to fire and push the transaction values to the datalayer. These values should then be passed to Analytics by Tag Manager.
Refresh Analytics. You should see your event appear under Event Category and Event Action. Proving that the data is being passed properly.


Still, in Analytics, click Conversions > Ecommerce.
Here you can find a wealth of information from the data you pushed to Analytics.
For now, click Product Performance to see a breakdown of products purchased.
Or Sales Performance to see a breakdown of total sales.
So how can we see how many people purchased shoes whose category was ‘discount’? Using audience segmentation.
- With Product Performance selected, click Add Segment.
- Click New Segment.
- Give the segment a name (e.g. ‘Shoe category’).
- Click Enhanced Ecommerce.
- Under Product Category, type in the category that matches the data layer variable name (‘discount’).
- Make sure ‘Purchased an Item’ is selected.
- Click Save.
Create extra segments for the remaining product categories.
You can then compare two segments against each other to see which one performs best. Remember that data inside Analytics is not realtime.
So, to verify everything is reporting you may want to check back in 24 hours.
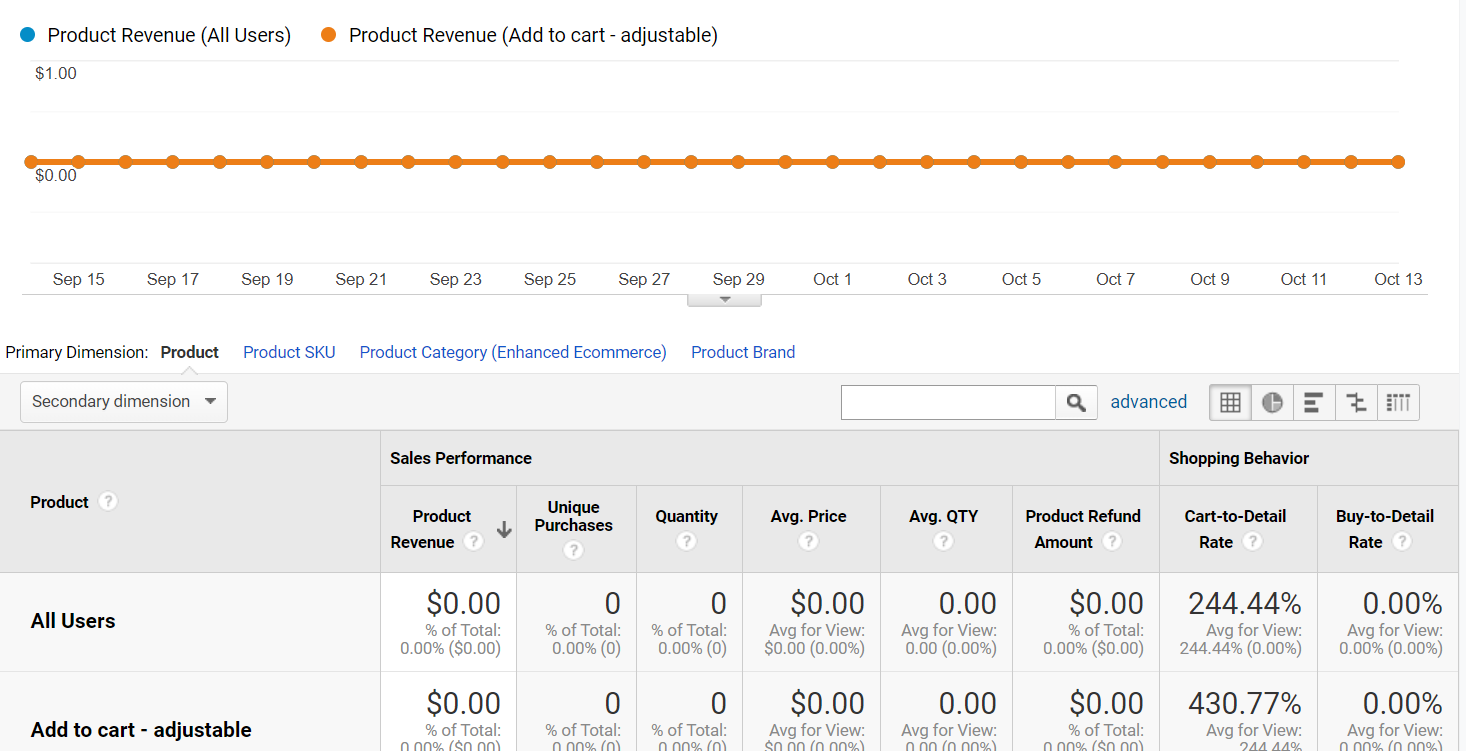

If it isn’t reporting, make sure that you set up your audience segment using the right information.
Also, check your tags and trigger setup and try again. Look at your code to make sure it all looks right.
And that’s all there is to it. It’s lengthy, and there are many places where you can make mistakes. So triple-check everything and take your time.
Of course, that was the hard way to do it. There are easier ways.
Passing Data to The Datalayer Using WordPress
Yes, if you use WordPress to power your site you can use a plugin to do most of the work for you. There is a plugin called GT4WP.
Once installed, you can find it in WordPress under Settings > Google Tag Manager.
All you have to do is install the plugin and add your Google Tag Manager container ID (GTM-XXXXXXX).
- Under Basic Events, select or disable the data you want to track in the datalayer.
- Under Events, do the same.
- Click Integration and complete the integrations you need (e.g. WooCommerce).
- Click Save Changes.
That’s pretty much it.
Testing your WordPress Datalayer
As before, log in to Tag Manager and put it in Preview mode. Go to your website and refresh the page to show the Tag Manager window at the bottom.
Perform an event (e.g. add an item to cart if you work with WooCommerce).
You should see, under Summary, that an event fires.
This is created by the plugin for when an item is added to cart. The plugin will create an event for when products are removed from the cart and other things.
If your website is not on WordPress, you have to write all these events yourself or use developers.


You can click that event shown to see the event itself and the datalayer after the message. The same as above. This lets you see the data passing to the datalayer and being stored.
Here you can also find the variable names (keys) that you can then use to create data layer variables in Tag Manager. Once you have done that you can create your Analytics tag and test it the same way as above.
In Conclusion
It is much easier to work with the datalayer in WordPress than doing it via HTML. But not all sites run on WordPress. So it depends on your sites and your needs.
But working with the datalayer gives you a whole new way of getting data out of your website and into Analytics. Sure, it may be a little technical if you are not a developer. But taking the time to understand the datalayer is worth it.
This is because you can extract much more data than what you might think and use that data to drive actions.
This article only covered a smart part of what you can achieve. When you combine the datalayer, Tag Manager and Analytics you can capture a ton of data.
Below you can find some further use cases for the datalayer and Analytics:
- Tracking when a site visitor downloads a file and its file type.
- Tracking when a high-paying customer fills in a form.
- Tracking when a user subscribes to your form
- Tracking when products are added to or removed from cart.
- Track when your products are clicked.
- Track product or promotional impressions.
Finally, another topic for an article for another day would be custom variables. How to pass a custom variable to Tag Manager and use it in Analytics as a custom dimension.
A custom variable is one that you and your developers want to track that isn’t one of Google’s standard ones. That means Analytics won’t recognize it. You have to do further configuration in Analytics.
Want to take advantage of the datalayer on your ecommerce site? Let Aware manage the digital marketing for your business today!